How to use the GPIO lines
GPIO Sysfs user interface (deprecated)
GPIO Sysfs is the standard way to manage the GPIO lines under Linux from user space. It uses the directory /sys/class/gpio to set or read any GPIO line.
Inside this directory there are two directories called:
- export
- unexport
To manage a GPIO line you have to know its kernel ID. The Kernel IDs of any Acme Systems SoM are available on:
The Atmel chips have the GPIO lines organized by 32 bit port called PA,PB, etc.
Before set or read a port you have to export it. Follow an example on how to set, reset and read the port PA1 (Kernel ID 1) from the command line:
Set the line status of GPIO line PA1
# echo 1 > /sys/class/gpio/export
# echo out > /sys/class/gpio/pioA1/direction
# echo 1 > /sys/class/gpio/pioA1/value
Reset the line status of GPIO line PA1
# echo 0 > /sys/class/gpio/pioA1/value
Read the line status of GPIO line PA1
# echo in > /sys/class/gpio/pioA1/direction
# cat /sys/class/gpio/pioA1/value
The official documentation about the GPIO Sysfs interface is available on:
Python examples
A simple module called acmepins is available on GitHub to manage the GPIO lines using the sysfs method.
As shown in the following examples with this module is possible to manage the GPIO states using directly the board pin names or the Atmel chip pin names or the GPIO Kernel IDs.


An output example: a Blinking led
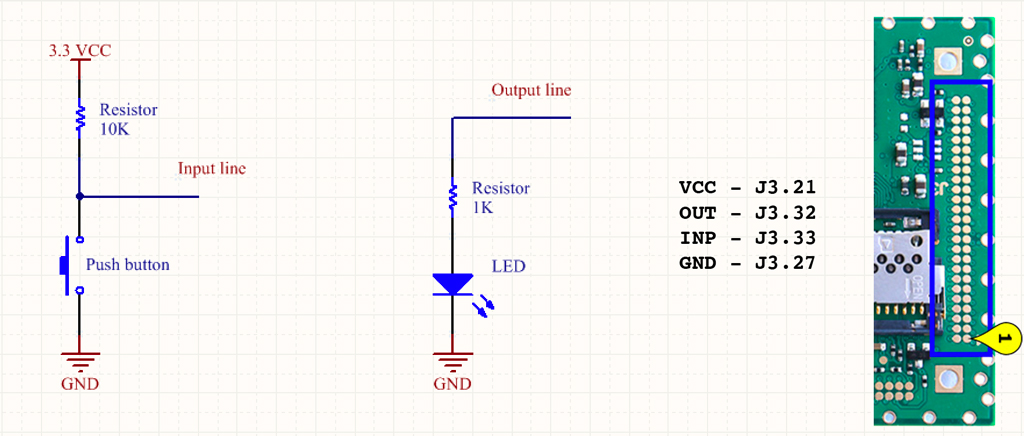
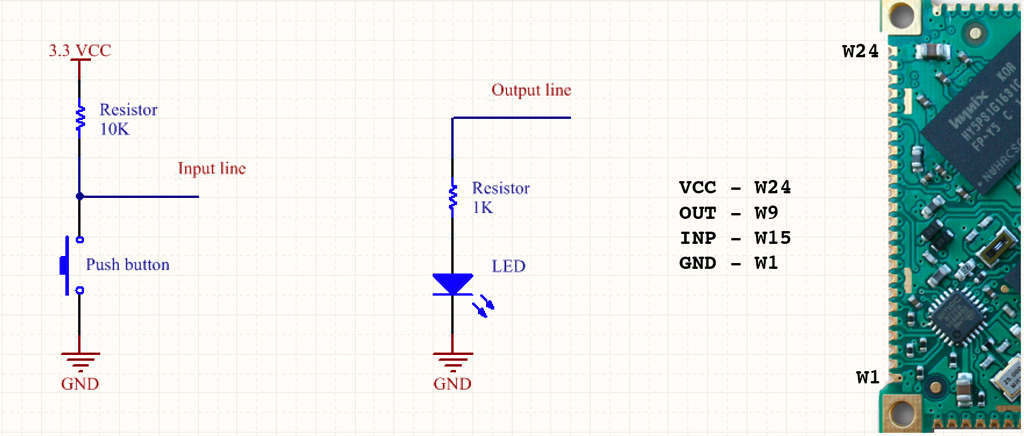
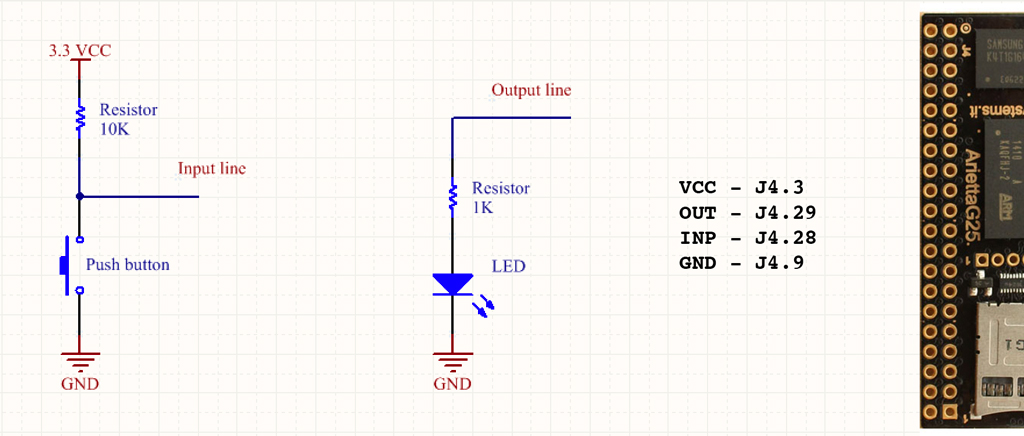
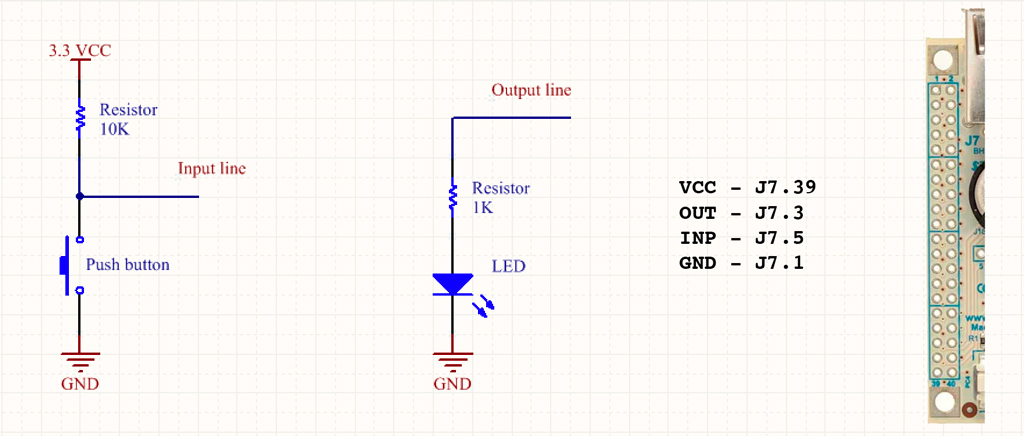
This example will blink a led wired to a output line
from acmepins import GPIO
from time import sleep

#FOX Board G20 example
led = GPIO('J7.3','OUTPUT')

#Aria G25 example
#led = GPIO('W9','OUTPUT')

#Arietta G25 example
#led = GPIO('J4.29','OUTPUT')

#Acqua A5 example
#led = GPIO('J3.32','OUTPUT')

while True:
    led.on()
    sleep(1)
    led.off()
    sleep(1)
An input example: Reading a push button
there are two ways o read a GPIO input state:
- Checking inside a loop the input state (polling mode)
- Setting a callback function for any input state change (event mode)
Polling mode
from acmepins import GPIO
from time import sleep

#FOX Board G20 example
Button=GPIO('J7.5','INPUT')

#Aria G25 example
#Button=GPIO('W15','INPUT')

#Arietta G25 example
#Button=GPIO('J4.28','INPUT')

#Acqua A5 example
#Button=GPIO('J3.33','INPUT')

i=0
while True:
    sleep(1)
    i+=1
    print i
    if Button.digitalRead()==0:
        print "Pressed"
        while Button.digitalRead()==0:
            pass
Event mode
from acmepins import GPIO
from time import sleep

def event_handler():
    print "Input changed"

#FOX Board G20 example
Button=GPIO('J7.5','INPUT')

#Aria G25 example
#Button=GPIO('W15','INPUT')

#Arietta G25 example
#Button=GPIO('J4.28','INPUT')

#Acqua A5 example
#Button=GPIO('J3.33','INPUT')

Button.set_edge("both",event_handler)

i=0
while True:
    print i
    i=i+1
    sleep(0.5)
One of three conditions can be checked:
- falling: the callback function is called when the signal goes from 1 to 0 (Not available on FOX G20)
- rising: the callback function is called when the signal goes from 0 to 1 (Not available on FOX G20)
- both: the callback function is called on any status change
C examples
gpiolib.c is a simple library to manage the gpio via sysfs in C.
Output example
#define GPIO_IN  1
#define GPIO_OUT 0

gpioexport(80);
gpiosetdir(80,GPIO_OUT);
for (;;) {
    gpiosetbits(80);
    gpioclearbits(80);
}
Input example
#define GPIO_IN  1
#define GPIO_OUT 0

gpioexport(80);
for (;;) {
    printf("%d\n",gpiogetbits(84));
}
The gpiolib.c library is available on Github.
Using the D.Gilbert gpio utils
An in-deep explanation on how the GPIO lines work and how to manage them faster is available on:
This is a small group of Linux utilities for the Atmel AT91SAM9G25 and AT91SAM9G20 microcontroller units (MCUs). The utilities target The Aria G25 and the FoxG20 boards from Acme Systems and will most likely work on other boards based on the same MCUs. Some of the utilities have the same names as those from the earlier FoxLX board from Acme System; that board was based on the Etrax LX processor from Axis communications.
These utilities mainly work with individual GPIO lines and may be extended to other protocols that can be implemented by "bit banging" GPIO lines. These include I2C (a.k.a. TWI), "one wire" (known as "w1" by the Linux kernel) from Dallas Semiconductor (now Maxim), and the two wire protocol for the SHT-71 .
Compile and build the utilities
Download on your board (not on your Linux workstation) the latest utilities version from the D.Gilbert
web server
For the CPUs AT91SAMG20 and AT91SAMG25:
~# wget http://sg.danny.cz/foxg20/ag25g20_utils-0.97r14.tgz
For the AT91SAMA5 CPUs:
~# wget http://sg.danny.cz/foxg20/sama5d3/sama5d3_utils-0.92.tar.xz
You need to install the xz-utils for the AT91SAMA5:
~# apt-get install xz-utils
Uncompress the .tgz / .tar.xz file
// for the G20 and G25:
~# tar xvzf ag25g20_utils-0.97r14.tgz

// for the A5:
~# tar xvf sama5d3_utils-0.92.tar.xz
If necessary you need to install the tools for compiling on board (remember to have a correct date on your embedded board before installing packages or update):
~# date -s "27 MAR 2019 11:14:00"
~# apt-get update
~# apt-get install build-essential
Compile and install them
// for the G20 and G25:
~# cd ag25g20_utils-0.97r14
~/ag25g20_utils-0.97r14# make
~/ag25g20_utils-0.97r14# make install

// for the A5:
~# cd sama5d3_utils-0.92
~/sama5d3_utils-0.92# make
~/sama5d3_utils-0.92# make install
Using the utilities
Refer to the original README file to learn how to use these utilities
Following is a list of quick examples:
Show the command list
~# g25gpio_status -h
Get the PIO attributes on given GPIO line
~# g25gpio_status -a -p A
PA0:
  PIO status: 0 (peripheral ACTIVE)
  PIO output status: 0 (line pure input)
  input filter status: 0 (glitch filter DISabled)
  output data status: 0
  pin data status: 0
  interrupt mask: 0 (DISabled)
  multi driver status: 0 (pin driven high and low)
  pad pull-up status: 0 (ENabled)
  peripheral A function [sr1:0, sr2:0]
  input filter slow clock status: 0 (master-fast)
  pad pull down status: 1 (DISabled)
  additional interrupt modes mask: 0 (Both edges)
  edge/level status: 0 (edge detection)
  fall/rise - low/high status: 0 (falling edge or low level detection)
  locked status: 0 (not locked)
  write protect mode: WPEN: 0 (DISabled)
  schmitt trigger status: 0 (ENabled )
  IO drive: 0 (HI_DRIVE)
...
of course it is possible to read all the other ports
~# g25gpio_status -a -p B
~# g25gpio_status -a -p C
Set the PIO attributes on given GPIO line
Show the command list
~# g25gpio_set -h
Disable the pull-up resistor on A/D input lines
~# g25gpio_set -p B -b 11 -u
~# g25gpio_set -p B -b 12 -u
~# g25gpio_set -p B -b 13 -u
~# g25gpio_set -p B -b 14 -u
Enable the low power Suspend To RAM feature on RoadRunner 1.1
~# mem2io -w -i fc040018,300
Related links
Related links
- SYSFS interface
- GPIO Kernel doc
- Acqua A5 pinout
- Aria G25 pinout
- Arietta G25 pinout
- FOX Board G20 pinout

Systems designer, webmaster of www.acmesystems.it and founder of Acme Systems srl
Personal email: tanzilli@acmesystems.it
Web pages: https://www.acmesystems.it --- https://www.acmestudio.it
Github repositories: https://github.com/tanzilli --- https://github.com/acmesystems
Telegram group dedicated to the Acme Systems boards: https://t.me/acmesystemssrl


